Beauty of a Site Blog
Matte Polish Manicure & Nail Art Ideas from Essie!
October 08, 2009
 |
 |
 |
 |
* For these layered looks, wait about 2 minutes between applying each layer! *
1. Glossy Nail with Matte Tip: Apply base coat and polish normally, then coat entire nail with glossy top coat like Essie Good to Go!. Carefully apply Matte About You to nail tips from side to side in a semicircular shape. (Or use nail guides to get the perfect tip!) 2. Matte Nail with Glossy Tip: Apply base coat and polish normally, then coat entire nail with a thin layer of Matte About You. Carefully apply Good to Go! to nail tips as described above. 3. Glossy Nail with Matte Moon & Tip: Apply base coat and polish normally, then coat entire nail with a thin layer of a glossy top coat like Essie Good to Go! Using the edge of a nail polish brush, apply Matte about You to the bottom third of the nail in a crescent shape. Carefully apply Matte About You to nail tips. 4. Matte Nail with Glossy Moon & Tip: Apply base coat and polish normally, then coat entire nail with a thin layer of Matte About You. Using the edge of a nail polish brush, apply Good to Go! to the bottom third of the nail in a crescent shape. Carefully apply Good to Go! to nail tips. Have fun! Let us know how your nails turn out!OPI Halloween Nail Polishes- Tattoo Ta-Boo Nail Art!
September 10, 2009
* Looking for the 2010 Halloween nail polish? Click here.
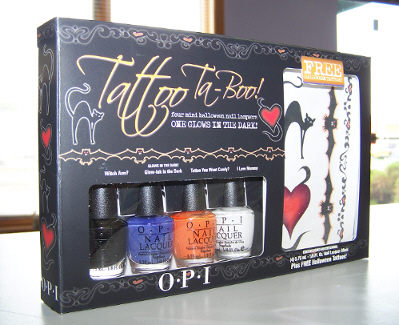
 OPI's Tattoo Ta-Boo Mini Halloween Nail Lacquers are quite possibly the cutest thing around our office right now. Nothing's more fun than letting loose with nail polish a little bit, and with these bright colors- even a glow in the dark one!- this is our perfect opportunity.
And let's be honest- what's more fun than glow in the dark?
Oh- glow in the dark nail art- that's what.
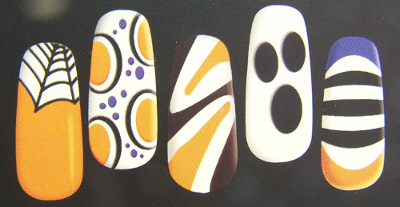
Check out OPI's suggestions for some super-fun Halloween manicures:
 And for those of us are beginners (come on... can YOU do that!?), here's some step by step instructions for simpler designs from OPI, right off the back of the box:
Give them a shot and let us know what you think!
 OPI's Tattoo Ta-Boo Mini Halloween Nail Lacquers are quite possibly the cutest thing around our office right now. Nothing's more fun than letting loose with nail polish a little bit, and with these bright colors- even a glow in the dark one!- this is our perfect opportunity.
And let's be honest- what's more fun than glow in the dark?
Oh- glow in the dark nail art- that's what.
Check out OPI's suggestions for some super-fun Halloween manicures:
 And for those of us are beginners (come on... can YOU do that!?), here's some step by step instructions for simpler designs from OPI, right off the back of the box:

Eyes On You Design1. Start with two coats of Glow-ink the Dark polish. 2. Use OPI I Love Mummy to make different sized white circles all over the nail. 3. Carefully dot each white circle with OPI Witch Arm? to make the pupils. (Or cheat, and use a sharpie!) |

Tip or Treat1. Start with two coats of Tattoo You Want Candy polish. 2. Use Witch Arm? to french tip your nails. (Need some French Tip help? Use these nail guides.) 3. Make three small circles near the nail bed using Witch Arm?. (Again, we might use a Sharpie). |
1. Start with two coats of Glow-ink the Dark polish.
2. Use I Love Mummy to make the stitches. Luckly, the design totally doesn't require straight lines.
3. Make a bunch of small dots using Tattoo You Want Candy? Fun! |


 Be Mine, Frankenstein